Friday, 21 August 2009

Using reflections creatively to remove hot spots

This blog should be read in conjunction with my tutorial on small item photography and my article on my 'free to make' lighting diffuser.

Yesterday I had to photograph a flat silver hammered pendant and it reminded me that this was a blog I had in mind to post.

Photographing flat metal parts on jewellery can be very problematic, especially highly polished silver, as it is mirror like and tricky to show any detail in - or to avoid showing detail that you don't want. But I have a couple of little tricks that should help you out. The examples used below are not especially competent, but slightly exaggerated - and done rather quickly - to illustrate the points - I'd recommend a little more time spent will get more subtle results. Please click on the photographs to see better views, they look rather dark on the page here.

Unwanted reflections:

Unwanted reflections can look pretty unpleasant - you don't really want to see the photographers distorted face in a curved surface on a piece of jewellery you might want to buy or a shiny prop used in the set - a huge great nose-heavy hamster like face gurning out of you from the metal. By simply angling the piece away from front-on will change what the item reflects - and hopefully the ceiling or inside of the light tent will be more attractive than the photographer's hands etc. and in many cases, this simple step alone will be enough to remove the unwanted details - or at least make the reflections less distracting. Angle the piece so that any flat surfaces reflect areas with little detail in or at least avoids items that are recognisable - we've all seen the examples of reflective eBay items with nekkid photographers. {{{ shudder }}}

With small digicams that are hand-held out in front of the photographer for them to use the screen display on the back, you often see a pair of hands and a camera in reflections - even in tiny areas of metal, where simply re-positioning the piece might not be enough. One of my methods for combatting this, where a simple change of position doesn't suffice, is to make a screen for my hands - I have a square of kitchen paper (just because it's flexible and easily replaceable) where I cut a circular hole in the centre, just large enough to slip over the camera lens - on mine I've taped a couple of tabs on the back so that I can keep hold of it too, to prevent it flopping in front of my lens. I hold this in front of the camera as I work and the only thing to reflect then is some white and a grey/black circle for the lens. A little less obvious and distracting than the pink of hands.
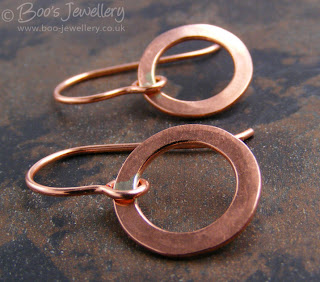
You want the true colour and detail of your piece to show, not be bleached to white from your lights.

But we can do better than this can't we?

Yes, we certainly can. And it doesn't take much. With flat silverware, especially in a setting where you're adding lighting for your photography, such as a light tent - or I use a translucent bucket as my diffuser/reflector - you can get very bright hot spots of light reflected off the metal surface, especially if it's highly polished. This can lead to what photographers call blown highlights. Highlight areas on the item where it is so bright white that no detail is recorded at all.

A blown highlight is one where the pixels in that area are completely white - no image data is recorded at all. Once this happens with an image, the blown area is lost forever, there is no detail at all to work with in your image. Underexposing the image can overcome modest highlight issues, but for a really hot reflection, this simply won't be enough.
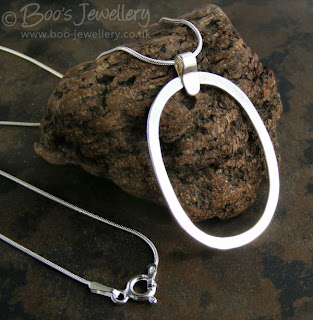
You can see how the light source on the right has created a very hot reflection, with no detail at all, on the shiny surface of this polished silver.

These blown areas not only look unattractive, you can't see any detail and it's maybe important that you do. You want your piece to look shiny and for the polish you've worked hard to give it to be evident, but not at the expense of too much detail being lost. So the best way to combat this is to create more appropriate & creative reflections. Actually make the piece reflect something other than the light.
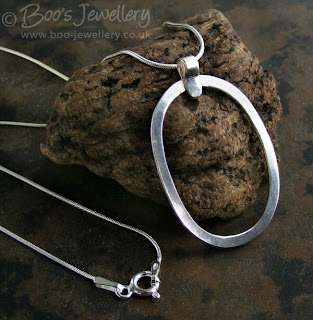
The creative use of a manually added reflection has put the detail back into this otherwise hot surface. I had to make a modest adjustment to the exposure of about two thirds of a stop to counter the slightly darker image.

My own favourite technique is deliciously simple and I use it a great deal. I have a collection of small pieces of black and grey card - ranging in width from around 13mm (½") to 40mm (1½") and about 200mm (8") long and I crease them a couple of inches from one end and bend it at right angles. These cards can be positioned around the perimeter of my diffuser, at the lighted side, the bent tab at one end trapped under the edge of my diffuser, to reflect back onto the piece where otherwise too much light is reflected. The tab sticking out allows me to swivel it around the outside of my 'diffuser' to find the best position.
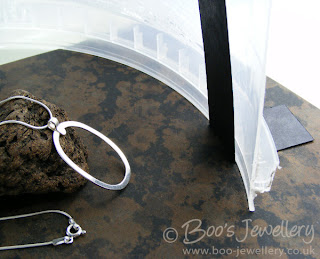

This causes the grey or black area of the card to be reflected off the metal where previously light was being reflected back. This kills the hot reflection and allows the detail to show. Where you position it and what size and colour of card you use will be determined by the size of your piece, your lighting source and a little trial and error.

I've used black card in these examples to exaggerate the effect, grey would have given a more subtle effect in this piece. Just hold the card initially and move it around see where you get the best effect. Sometimes a long thin piece will give a nice striped band over the surface, making it look shiny, sometimes you need the entire surface (if you have an engraved surface or similar) to reflect something back, so a larger piece would be more appropriate.

You can also use something like a 'helping hands' tool or simply a paper clip, blutak or stationery clip to temporarily position a small reflector where you get the best effect. Look through the camera and move it round in your hand until you like the effect on your subject. Sometimes I put the camera on a tripod or bean bag and set the 10 second timer and move the reflector until I like the effect, then hold still for it to take the photograph. I sometimes do the same with a little LED torch for the opposite effect, if I want to try and get a highlight in a particular place.
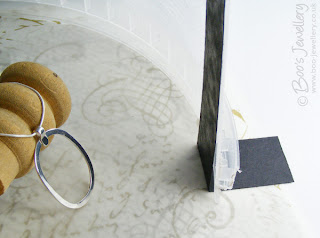
As you can see, you don't need a very big piece of card to reflect back and darken the surface. I used black in this instance to exaggerate the effect.

Reflected light may be more subtle:

My own lighting set up, as linked previously, uses a 'bucket' diffuser with a single light source at one side and scrunched aluminium foil pasted inside the opposite side reflecting that light back onto the subject. Where I find I get very hot highlights, I have found that rotating the subject within my diffuser so that it faces the reflector side rather than the light source often gives better results. I have a little less light on the subject this way, but that's often just what's needed. The aluminium foil has been scrunched up before sticking in place, so the reflected light is scattered over the subject, removing the more direct light that often causes the hot highlights.
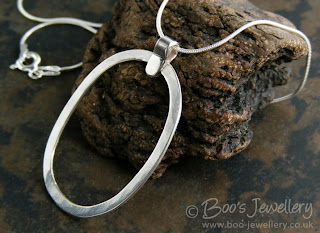
This image was taken facing the reflector rather than the light source and is more subtle as a result. I used a small reflector to put some shape into the bail and some darkness at the bottom of the oval where it was otherwise brightest.

One of my finished images, taken with the set up shown above. I wanted to make it look shiny and show some form to the bail, so used a thin black reflector in this image.

Thursday, 13 August 2009

They were so full of promise

After a week of fluctuating weather - some days glorious, some positively autumnal, some days had a bit of both, I finally had what looked like edible tomatoes.

They had been fully formed and green for some time, but it has taken perhaps 3 week for them to actually turn red - at first there was a patchy flush of peach colouring, it deepened to an all-over orange and finally this week, they actually looked like proper tomatoes. At least a few of them do - I still have about 40 green specimens, at this rate, they'll end up in chutney.

My husband has monitored them like a kid waiting for a cake to rise, wide eyed and salivating. He loves a flavoursome tomato and loves the smell of them, commenting on the fragrance everytime he brushed past the plants.

I think we'll have to be satisfied with enjoying them this way - as a visual creation. Please click to see a larger copy.

Last night, he could contain himself no longer and went out and picked the 5 tomatoes shown - he called me down to witness them and ceremoniously grabbed our best serrated tomato-cutting knife and chopping board and sliced the juiciest example right down the middle, mercilessly splitting it asunder.

We stood in admiration at the perfectly formed centre and juicy fruitiness of something that came into being at our own hand. We steeled ourselves to savour the moment of glory and each mouthed a half. It's true to say that the flavour was good. Very good. Just what you'd hope for from a home grown, loved and well tended specimen.

But it was mushy and soft and the texture was pretty unpleasant. I suspect the long period they took to ripen was not kind on the fruity flesh. I feel so sorry for him, he was so looking forward to eating them, I feel that he has been cheated and it was with a heavy heart as I put the breakfast things back in the fridge, I saw that the remaining four specimens were sitting there un-loved. They never even made it into his lunch box. What a cruel blow for him after all that anticipation.

Monday, 10 August 2009

Bringing a piece of metal to life

We had a reasonably rare summer weekend of decent weather and I was sitting in the garden finishing off a piece I'd been working on and my husband was nearby. He took the piece and turned it over in his hand and asked how much I was going to sell it for. He shrugged and said that if people knew how much work went into it and all the stages, necessary tools and skills involved, they'd realise what a bargain they were getting.

So I decided that it might be useful to take the piece in question and outline the workflow such a piece entails to get it to the stage where it is ready to present to the buying public. I wish I'd taken photos of it in progress, but I will do with the next piece.

The raw ingredients I started with.

The piece is a 50mm/2" diameter heavy copper ring pendant, hammered and filled with random copper squiggles, bound with wrappings of Sterling silver, complimented with a Sterling silver wrapped bail - all hanging from an antiqued copper chain with hand crafted hook and loop fastening.


1. The first stage is to come up with the design. Sometimes I draw an idea straight off and work it from that initial idea and it ends up almost exactly like my drawing. Sometimes I start with an idea and it morphs as I work into something different and sometimes I just pick up materials and the design just happens - some materials just present their own ideas. In this case, it was a plan to replace some recently sold pieces with something similar - but not copies - same basic design premise, but different shapes. So I didn't initially sketch this time - although I did part way through as I wanted to visualise what style of bail to use.

2. I worked the heavy copper into a ring and prepared for soldering closed. In order to make a good, safe connection, the join in the metal before I switch the torch on must be as perfect and clean as it can be. So I carefully position and angle the cut ends and clean and smooth the end surfaces. If I put the piece down and then can't find the join, I know I've done a decent job in preparation. The idea is to bond the ends to each other, not to connect the ends by filling the gap with a blob of molten solder. If you can see more than a pencil line width of solder in the join, you did a bad job. I find the trickiest aspect of this is actually cutting a piece of solder small enough - even the tiniest little ball will cause it to run over the outer surface if you were good in preparing a really nice tight join.


3. The join needs to be soldered with silver solder - I need a torch, solder, flux and safety gear and an appropriate place to work. I have to prepare my work area meticulously before lighting the flame - you don't want to find some key tool is out of reach and be tempted to reach over a hot work surface. I only once started to work and realised that my goggles were on the bench, not my nose - and that was the very moment I lost my eyebrows, eyelashes and an inch from the front of my hair. I was very lucky that was all I lost, as a failed O ring in the torch caused me to be engulfed in flames - it happened in an instant. Please never be tempted to save time or cut costs by compromising safety. Gear simply can fail and accidents can just happen - ensure you're as safe as you can be, I learned that lesson the hard way - make sure that you learn from it too - not first hand.

4. Once the joint has been soldered, the piece will have become firescaled and blackened and needs cleaning - this is done by immersing in a hot pickle solution and subsequently cleaning. The torch heat will also have softened the copper too, so it needs carefully re-shaping and hardening. I did this for this design by hammering the ring slightly flat, after ensuring that I had a good circle shape.


5. I now create the internal copper squiggles, which takes quite some trial and error to get them to fit in the circle and touch each other and the edges enough to ensure the piece is stable and secure in wear. Once satisfied, I hammer them for appearance and to lock the shape. This then requires some further fine tuning as the hammering expands the size of the piece, even though I'd made it a bit small initially in anticipation.

6. I decided that the open size of the circle would be more secure if the inner squiggles were soldered to the frame in a couple of spots - this would also benefit me in securing it for me to wrap with the silver - the first wraps can be like knitting with mercury without something to keep it all stable. So in order to ensure that it joined exactly where I wanted it, I needed to prepare the joints as carefully as previously and I had to temporarily wire the squiggles to the frame so that they didn't move while I worked.

7. Once soldered, I again had to treat the firescale by pickling and then also re-harden the copper. Ideally, I would have done all the soldering in one sitting, but the design and workflow don't always make this practical. At this stage I fine-tuned the shape and finally hammered the overall piece for finish and strength.


8. By now I was ready to wire wrap with Silver. I wrapped carefully at all the junctions where the two frames connected, with soft Sterling wire. This is best done by doing part of one, then a section opposite, gradually working all the sections, to ensure that the tension of the overall piece isn't compromised - although the earlier soldering makes this task much easier.

9. The raw ends of the silver were all carefully pressed down tight on the back of the piece and the ends individually filed to ensure that there are no snag hazards on the back of the piece.

10. I was now ready to add a bail. My first early thought was to wrap something in silver to co-ordinate with the decorative edge wrappings - and despite several sketches to explore other ideas, I didn't change my mind - it felt right for the design. So I created a double wire loop bail and wrapped the ends around the outer circle.


11. The ends of the bail were also extensively filed as the heavier gauge of silver wire used would present a serious potential to scratch if the ends weren't smoothed. I used several gauges of file to take the corners off the cut ends, finishing with some elbow grease and polish to give a lovely smooth finish to the touch.

12. At this stage, I considered the metal work to be completed and the next stage would be to finish the piece - in terms of both colour and touch. I love it when a metal piece feels silky smooth to the touch and I put a lot of effort into this stage. I manually polished any imperfections in the surface - this needs time and a lot of caressing the piece with your fingers - I am guided by how the metal feels to my touch. Once satisfied with this stage, I tumble polish the piece, checking regularly, to get a nice surface feel and to clean the metal thoroughly for oxidising.

13. I like to antique both copper and silver pieces where I've done much wrapping, as the oxidisation really brings out the texture of the coils and adds detail. So the entire piece was oxidised to black in a warm liver of sulphur solution. This is how I often end up working in the garden - it tends to pong, so I usually do this outside.


14. Once oxidised thoroughly to black (see the stages illustrated above), I wash it or tumble it again in warm soapy water, to get the surface clean to the touch for final polishing. I'm not going to detail how I do this stage, as I suspect I do it differently from other people and I'd like it to remain my little secret for now. Suffice it to say, I usually end up with very grubby hands. At this stage I always work by hand to get just the finish I want.

15. When I like the colour, I usually tumble polish it again for a short while, simply to ensure it is properly clean - I wouldn't want my customer to end up with a dirty neck the first time she wears it. Sometimes I tumble, sometimes I wash it by hand and use a baby toothbrush to get in the nooks and crannies.

16. The pendant may be finished, but there's still work to do. I like to make my own clasps and the copper chain I want to hang this pendant on will be closed with a hand crafted hook and loop. I tend to make the clasps in batches ready for use, but both components are made from raw wire. The wire for the hook is initially given a round end, which is hammered and shaped into a lip, the hook and it's connecting loop formed, then hammered some more for stability and both parts are polished and antiqued to match.


17. I then need to photograph the jewellery - in order to publish maybe 7 photos I will take 15 or more to choose from. They need editing, re-sizing, cropping, sharpening and retouching (polishing cloth lint is almost invisible to the eye, but a large resolution image makes them huge on screen). I also need to measure the item and write a description and add these to my various on-line shops. I need to purchase packaging and make wrapping materials - I need to know about postal services and customs forms and maintain records and spreadsheets and submit my own tax return.

Only now is it ready to sell - I hope you can see how much effort and care is involved and just how many skills I need to hone to get this far and how much equipment I must purchase, maintain, power, light, insure and know how to use - from hammers and pliers, to blow torch and goggles to computer and camera. I hope when you understand this, you can appreciate the price tag attached to this piece and feel that it is fair.

Wednesday, 5 August 2009

My One Pound hanging basket

I've touched before on our lack of gardening budget this summer, after my husband was out of work for a little while this spring. Consequently, I had to make what we had go a little further.

But it's actually been an interesting exercise. I spent a very modest amount on annual 'bedding' plants for pots and baskets and spread it all rather thinly. But I think there has been real value in doing so. In the past, I've crammed pots with a selection of plants and by this time of year, despite feeding and TLC, they've been starting to look weary. I think I have simply over-planted in the past. We've also gained some advantage this year by not taking a summer holiday, just as the garden was looking its most fabulous.

Please click to see a larger view of the photographs.

Despite the very modest outlay on annuals, we have a great showing of colour and the garden is as nice as it has ever been. I kept it very simple - I planted several medium sized terracotta pots I already had with single plants or a cluster of assorted Lobelia plugs. They all look fabulous now - each one is a dome of colour, especially the Lobelia pots. This is very certainly a practice I'll continue in future years, I really like the effect.

I had some successes and some failures. The greatest successes happened to be the minimal spend items and the total failures were unfortunately the most expensive. Another lesson learned. I bought some gorgeous deep red chrysanthemums - they were fabulous specimens and I was full of hope. They were the single most expensive plants I bought. They turned out to be nothing more than expensive snail fodder, as blogged previously. They were totally laid to waste within 48 hours. I also bought some yellow and orange tagetes, as these have given a good showing in previous years. They went the way of the chrysanthemums - but did manage to at least hold out for 72 hours.

But one of my greatest joys has been two trays of tiny little fuchsias I bought - they were in a local DIY store on a BOGOF offer when we went to get some plumbing supplies to repair an emergency leak - so I wasn't even looking for plants. I paid £3.99 for a tray of 10 small plants, with another the same free. Some of the plants were a little weary, so I rummaged through the stacks of trays to find the healthiest looking specimens - so 20 fuchsia plants at 20p each! All 20 plants have positively thrived and have just started to burst into flower this week. They're all supposed to be the same plants, but there is clearly more than one variety in there. I have five additional pots featuring them too.

They looked so tiny that I planted 5 of them in the hanging pot I had retained from last year - it looked somewhat pathetic for a while. But the flowers have burst open this week, with masses of buds now showing.

So the hanging basket by my back door cost me £1 this year - this must be worth a pound of anyone's money!

LinkWithin

Related Posts with Thumbnails