
Please click on any of the photographs and diagrams for a larger view.
 I use my ribbon roses to decorate my jewellery packaging to customers, on my hand made envelopes - a tutorial for which can be downloaded from the bottom of the page of an earlier blog.
Some initial observations:
I've seen this method and variants of it on various blogs and how-to sites, so I have no idea who would own the rights on such a thing - if anyone - so I apologise if I'm stepping on anyone's toes. I suspect that because many of them seemed to start the same way - and it didn't work well - they may all have learnt it from the same sources.
The tutorial below is therefore my own interpretation of several other tutorials I'd read and then gradually modified to suit my own needs and give more reliable results for my own requirements. So this is very much my own personal workflow, worked out to make a particular result, so you're sure to adapt it yourself to suit your own needs.
My personal criteria when working the first roses, was to make something with a short flexible stem, just long enough to allow it to be tied into ribbon as an extra decoration on my jewellery packaging. If you want the stems longer or more rigid, you'll need to fix a length of wire to the rosebud before the final wrap of green florists' tape.
 My own requirement was to fix it with ribbon by a short flexible stem to my gift packaging.
After I made the first few roses, it was clear that the initial methodology gave variable results. Some were very nicely shaped, with petals spiralling from a tight central core, just as a real rose would, where others were rather untidy knot like structures - rather more free-form rose shapes. They worked well enough, but I liked the spiral pattern better. I needed to ascertain why some worked better than others and the start of the tutorial is a result of that deliberation. It's simple enough after the initial stages, but the starting 2 folds seem to be the pertinent ones - hence also including diagrams to hopefully make it as clear as possible.
 You'll need ribbon, florists tape and fine wire for securing - cut to length and kept within reach before you start.
What you need:
Ribbon - at least 12mm (½") in diameter
The roses shown in my photographs were all made with a length of ribbon very approximately 12 times as long as it is wide. So if your ribbon is 25mm (1") wide, you'll use a piece approximately 300mm (12") long for each finished rose - but you'll need a piece twice this length initially to form the rose, more below. The longer the ribbon you use, the fuller the resulting bloom will be.
The small pink rosebuds on the packaging were made with 15mm (0.6") wide ribbon, the larger satin ones for the tutorial were made with 25mm (1") ribbon.
Wire, to secure ~ and maybe some for stems:
I used fine wire to wrap the ribbon tightly to secure it when made - florists' wire or very fine craft wire. My florist's wire ran out after I'd made a few, so I switched to 0.4mm (26ga) copper wire which worked well. It needs to be fine and flexible and you'll use about 75mm (3") per flower.
If you want to add longer stems, you'll need some lengths of something heavier and stiffer.
Green florist's tape:
In the past I've used a thin tacky plasticy tape, rather like a heavier coloured version of plumbers' PTFE tape, which when wrapped on top of itself will stick rather like clingfilm, back on itself and is soft enough to press into shape and mould around the structure. The one I used in the photographs was a heavier tape, with a crepe like texture which allowed it to stretch and it seemed waxy, allowing it to be pressed against itself, although it sometimes needed a little coaxing and seemed to work better when worked a little with warm fingers. When cooled again it appeared to stiffen up again and remained fixed.
The advantage of the more papery texture of it allowed me to extend it above the bloom as I started the wrap, making a little stylistic calyx type leaf around the flower.
You'll also need scissors and wire cutters.
The tutorial:
Most rosebud tutorials using this methodology recommend that you start with a particular cut length of ribbon. But the technique requires that you need half of the ribbon for making the shape, but once formed, it's cut off, surplus to requirements - discarding over 40% of your starting piece each time - too small to make another rose. I thought this was pointlessly wasteful, so I've worked from one end of my length of ribbon, only cutting it once the rose was formed and I was happy with it. So if you're going to work this way, unravel a little spare before starting to give you room to manoeuvre.
After some trial and error, I felt that the roses are their optimal prettiness when kept a little smaller, with fewer petals. The longer the length of ribbon you use, the fuller the rose becomes, with more rounds of petals. They don't fill out and get larger and wider as a rose would in reality, they just stack up taller - so once you have 2 full rounds of 'petals' it doesn't seem to look any more attractive to make it any larger, but experiment to see what you like.
All of the roses illustrated have been made to approximately the same proportions with roughly the same quantity of petals. The length of ribbon used is simply proportionate to the width - a length of around ten times the width seems to give a nice full, just opening, rosebud.
Tip: Before you start, have to hand a short piece of your craft or florists wire, ready to secure the rosebud. At the point you need it, one of your hands will be occupied holding the rose together, so you won't easily be able to cut a piece, so prepare it ready and put it within reach.
 Approximately measure your ten times width along the ribbon length, from the cut end and hold the ribbon vertically in front of you (cut end at the top) and fold up the bottom half (joined to the spool or at least the rest of the ribbon) and to the right to make an L shape at your measured point. See Fig. 1 above. If your ribbon has a clear right and wrong side, hold the wrong side towards you - although ultimately is doesn't make much difference as you'll see both sides in the finished rosebud.
 At this point you will have an angled fold at 45 degrees on the outside of the corner and an internal right angle. You then need to make another fold upwards to give yourself another right angle corner on the outside too. So fold the horizontal length of ribbon upwards - so that surface A meets surface B as in Fig. 1 and your result should now look like the shape in Fig. 2.
 You now have a proper clean L shape with a little triangle of ribbon as the uppermost layer. From now all your folds are straight along the length of the ribbon - either top to bottom - or left to right.
 Fold the cut length of the ribbon down vertically from top to bottom over the triangle of ribbon - as indicated by the red arrow and at the dotted line in fig.2. Your next fold is to bring the spool end of the ribbon over the top of it, from right to left, see fig. 3 below.
 You now continue to concertina the two ends of the ribbon back and forth over each other at 90 degrees, until almost all of the ribbon at your cut end has been used. So first fold is top > bottom, second fold right > Left, then back to the first end, now bottom > top and back to the spool end from left > right - and repeat!

 Fold the two ends of the ribbon back and forth over each other - one goes vertically, the other horizontally.
I finish when I have a little tail left of the cut end, projecting beyond the square folds, as this gives you a little tab to hold onto and will be useful later for something else. Make one last fold of the spool end of your ribbon to be the last in the pile. You should have a Christmas garland style concertina of folded ribbon beneath your thumb. It isn't necessary to keep hold of this folded length, as such, as it holds its shape anyway.

 You now need to flip the pile of folded ribbon over and insert your thumb on top of the tail of your cut end of ribbon and just keep hold of this with the last layer of the spool end of ribbon held secure against your forefinger behind it. Keeping the ribbon in the same position, release your grip just enough to pull gently on the spool end of the ribbon at the bottom and pull it out of the folded pile, keeping everything in position between your fingers, forcing the rest of the ribbon 'garland' you folded, to contract and bunch up - this is what makes your rose.
 You're almost there, you can see the central triangular first folds you made starting to spiral at the centre. It's the bias of the ribbon threads where you made the angled fold that makes that nice swirl.
 As you have pulled almost all of it through - nice and steadily, don't yank it - you'll see the little triangle fold you started with form into a little spiral at the centre of the rosebud. Once you see this, your rose is formed and you can stop pulling. Pretty much all of the spool side of the ribbon, from those first central folds, has now been pulled through, your rose is formed predominantly from the ribbon between those first folds and the cut end. So you can see how it would be wasteful to cut a length initially to work with.
At this point, if you're not happy with the look of your bloom, simply shake it loose and start over.

After a little trial and error, I decided that the little tail you have left - about once or twice the width of the ribbon - from your initial cut end of the ribbon - can be wound around the spool end of the ribbon, coming from the centre of the rose, to neaten it underneath and form a rudimentary stem - just look at the last fold as it leaves the back of the rosebud and ensure that you have one complete petal before winding it round, hence leaving enough spare to tinker with.
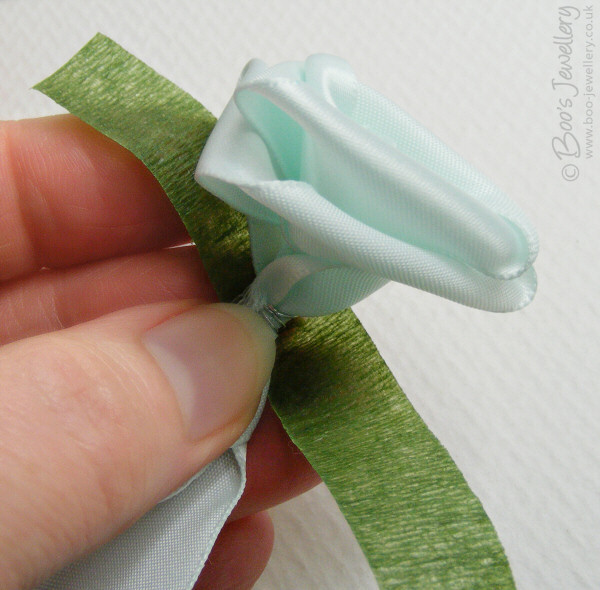
Wrap this short tail around the spool end length of the ribbon hanging out from the centre of the rose and then wrap tightly around this with your florists wire - see now why I advised you to have it ready! This neatens away your cut end and gives a little fullness behind the bloom.
If you require a more substantial stem - now would be the time to include it (probably insert it into the centre of the ribbon) and wrap it to the rosebud with your fine wire. Ensure that your florist wire wrap is nice and tight and all ends secured by pressing them well into the ribbon. You're going to cover it with tape, but a projecting point will still slash through a finger.
At this point I tend to cut the ribbon from the spool a couple of inches (50mm) below the rosebud, at an angle. This short length of ribbon will become a soft, tapering stem, once wrapped with florists tape.
 Hold the green tape at an angle behind your rosebud (I work straight off the spool, you're only using a few inches), leaving it projecting up beyond the bloom and start wrapping it around the wired section behind the petals to cover the wire and any cut edges of ribbon and gradually down the loose ribbon end - to neaten and finish everything off. Twist that loose ribbon tightly as you work to make a stem and wrap the green tape around this. My tape was waxy and with warm fingers, softened enough to stick to itself as I worked. Once past the end of the ribbon, twist it around on itself a little to secure and ensure that it has stuck - or just add some glue to be sure.
 Once you're sure it is all secure and isn't unraveling, you can trim the end to taste and trim the starting end of your green florists tape to a long point as a pseudo-calyx for your rose, behind the petals. If you want to be more authentic, you can add a couple more lengths of tape behind the rosebud and trim the points for a fuller set.
 Trim the starting end of the florists tape to a point as a pseudo-calyx for your rose, you can add more for greater authenticity.
 All done!
© Boo's Jewellery. 2010. All rights reserved.
Whilst I can't make any claim to this method, I can on the words and images used to present it and would ask that it isn't posted or used elsewhere without written permission. Please refer people directly to this blog only. I reserve the right to edit it, move it and possibly publish it in future for a fee. You are welcome to make roses for use - but not to sell directly as a finished product in themselves.
Whilst I can't make any claim to this method, I can on the words and images used to present it and would ask that it isn't posted or used elsewhere without written permission. Please refer people directly to this blog only. I reserve the right to edit it, move it and possibly publish it in future for a fee. You are welcome to make roses for use - but not to sell directly as a finished product in themselves.
4 comments:
oh wow, boo, that looks absolutely ace! i have to find time to give this a go... thank you :)
Oh, excellent! Thanks for taking the time to write it all up! I'll have a go once I find some ribbon :)
(Huh, blogger is giving me errors when I try to comment using OpenID).
Thanks - please do let me know if any of it doesn't make sense once you start and work with it.
Oh your little rose buds are so pretty. What a nice touch adding these to your packages. Makes it extra special. I am going to have to try and make some. Thank you for sharing your wonderful tutorial.
Post a Comment