Yesterday I had to photograph a flat silver hammered pendant and it reminded me that this was a blog I had in mind to post.
Photographing flat metal parts on jewellery can be very problematic, especially highly polished silver, as it is mirror like and tricky to show any detail in - or to avoid showing detail that you don't want. But I have a couple of little tricks that should help you out. The examples used below are not especially competent, but slightly exaggerated - and done rather quickly - to illustrate the points - I'd recommend a little more time spent will get more subtle results. Please click on the photographs to see better views, they look rather dark on the page here.
Unwanted reflections:
Unwanted reflections can look pretty unpleasant - you don't really want to see the photographers distorted face in a curved surface on a piece of jewellery you might want to buy or a shiny prop used in the set - a huge great nose-heavy hamster like face gurning out of you from the metal. By simply angling the piece away from front-on will change what the item reflects - and hopefully the ceiling or inside of the light tent will be more attractive than the photographer's hands etc. and in many cases, this simple step alone will be enough to remove the unwanted details - or at least make the reflections less distracting. Angle the piece so that any flat surfaces reflect areas with little detail in or at least avoids items that are recognisable - we've all seen the examples of reflective eBay items with nekkid photographers. {{{ shudder }}}
With small digicams that are hand-held out in front of the photographer for them to use the screen display on the back, you often see a pair of hands and a camera in reflections - even in tiny areas of metal, where simply re-positioning the piece might not be enough. One of my methods for combatting this, where a simple change of position doesn't suffice, is to make a screen for my hands - I have a square of kitchen paper (just because it's flexible and easily replaceable) where I cut a circular hole in the centre, just large enough to slip over the camera lens - on mine I've taped a couple of tabs on the back so that I can keep hold of it too, to prevent it flopping in front of my lens. I hold this in front of the camera as I work and the only thing to reflect then is some white and a grey/black circle for the lens. A little less obvious and distracting than the pink of hands.
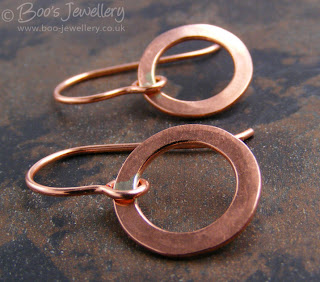 You want the true colour and detail of your piece to show, not be bleached to white from your lights.
But we can do better than this can't we?
Yes, we certainly can. And it doesn't take much. With flat silverware, especially in a setting where you're adding lighting for your photography, such as a light tent - or I use a translucent bucket as my diffuser/reflector - you can get very bright hot spots of light reflected off the metal surface, especially if it's highly polished. This can lead to what photographers call blown highlights. Highlight areas on the item where it is so bright white that no detail is recorded at all.
A blown highlight is one where the pixels in that area are completely white - no image data is recorded at all. Once this happens with an image, the blown area is lost forever, there is no detail at all to work with in your image. Underexposing the image can overcome modest highlight issues, but for a really hot reflection, this simply won't be enough.
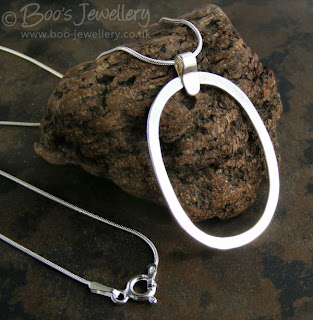 You can see how the light source on the right has created a very hot reflection, with no detail at all, on the shiny surface of this polished silver.
These blown areas not only look unattractive, you can't see any detail and it's maybe important that you do. You want your piece to look shiny and for the polish you've worked hard to give it to be evident, but not at the expense of too much detail being lost. So the best way to combat this is to create more appropriate & creative reflections. Actually make the piece reflect something other than the light.
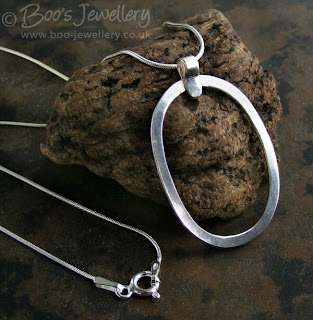 The creative use of a manually added reflection has put the detail back into this otherwise hot surface. I had to make a modest adjustment to the exposure of about two thirds of a stop to counter the slightly darker image.
My own favourite technique is deliciously simple and I use it a great deal. I have a collection of small pieces of black and grey card - ranging in width from around 13mm (½") to 40mm (1½") and about 200mm (8") long and I crease them a couple of inches from one end and bend it at right angles. These cards can be positioned around the perimeter of my diffuser, at the lighted side, the bent tab at one end trapped under the edge of my diffuser, to reflect back onto the piece where otherwise too much light is reflected. The tab sticking out allows me to swivel it around the outside of my 'diffuser' to find the best position.
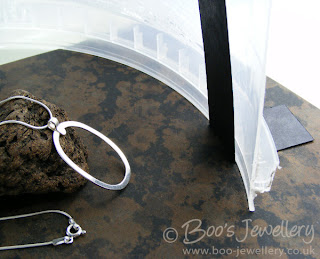
This causes the grey or black area of the card to be reflected off the metal where previously light was being reflected back. This kills the hot reflection and allows the detail to show. Where you position it and what size and colour of card you use will be determined by the size of your piece, your lighting source and a little trial and error.
I've used black card in these examples to exaggerate the effect, grey would have given a more subtle effect in this piece. Just hold the card initially and move it around see where you get the best effect. Sometimes a long thin piece will give a nice striped band over the surface, making it look shiny, sometimes you need the entire surface (if you have an engraved surface or similar) to reflect something back, so a larger piece would be more appropriate.
You can also use something like a 'helping hands' tool or simply a paper clip, blutak or stationery clip to temporarily position a small reflector where you get the best effect. Look through the camera and move it round in your hand until you like the effect on your subject. Sometimes I put the camera on a tripod or bean bag and set the 10 second timer and move the reflector until I like the effect, then hold still for it to take the photograph. I sometimes do the same with a little LED torch for the opposite effect, if I want to try and get a highlight in a particular place.
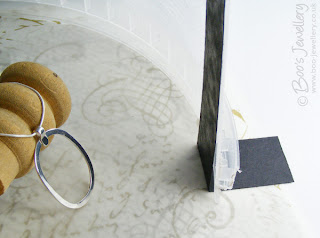 As you can see, you don't need a very big piece of card to reflect back and darken the surface. I used black in this instance to exaggerate the effect.
Reflected light may be more subtle:
My own lighting set up, as linked previously, uses a 'bucket' diffuser with a single light source at one side and scrunched aluminium foil pasted inside the opposite side reflecting that light back onto the subject. Where I find I get very hot highlights, I have found that rotating the subject within my diffuser so that it faces the reflector side rather than the light source often gives better results. I have a little less light on the subject this way, but that's often just what's needed. The aluminium foil has been scrunched up before sticking in place, so the reflected light is scattered over the subject, removing the more direct light that often causes the hot highlights.
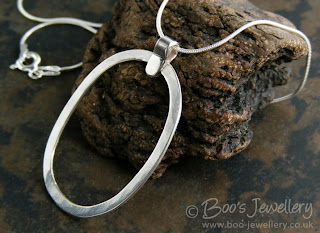 This image was taken facing the reflector rather than the light source and is more subtle as a result. I used a small reflector to put some shape into the bail and some darkness at the bottom of the oval where it was otherwise brightest.

6 comments:
This is really helpful, thanks. I've been following all your photography tips for jewellery and have noticed a real difference in my Etsy shots.
Thanks so much for taking the time to share your expertise ;)
I'm delighted that they might have helped someone. I tend to blog on subjects that I see coming up time and again on the Etsy forums. I have a lot more ideas to write about in future too. So be warned!
Boo, I have got to the point when I was happy with my pictures mostly, other than my problems with shiny surfaces! I will give what you describe here a go - thank you so much for taking the time to share your knowledge!
All of your tips have been so wondeful! You're becoming one of my favorite people that I have found through Etsy. I'm planning to try so many new things with my camera and my craft show displays, all from your blog and posts. Thanks so much!
Jenny
@ Jenny, I'm delighted that you've found something useful from my ramblings - thank you for letting me know, it's really nice to get feedback.
Very clever!
Post a Comment